For the past year or so, I have been struggling to keep up with the post processing side of my photography. Although most of my photography gear is pretty much a year or two old, my laptop was turning 5 this year and it was quite obvious that the 'cracks' were beginning to show. I had experience multiple software crashes, endured troubling moments when my laptop refused to to restart instead opting for the famous blue screen which was always a scare. Thankfully, each time this happened, my laptop would stutter back to life after 8 - 10 restarts.
With all this trouble, I knew it was a matter of time before the PC/Mac Gods started beckoning me to indulge in more tech. For an entire year, I dabbled in the debate of PC vs Mac. I had already been through this four and a half years ago when I was contemplating between a Windows based laptop or Macbook. Then, the answer was to go down the path of least resistance and opt for the notebook. I say path of least resistance because I had been a Windows user all my life.
Throughout 2016, I spent many hours pouring over the pros and cons of PCs, laptops, iMacs and Macbooks. After much deliberation and research, I learnt that PCs were making a come back in the photography world as more photographers begun opting for a PC based system due to increased performance and ease of use rather than the minimalistic Apple approach that meant a tonne of accessories sticking out from all sides of the iMac/Macbook.
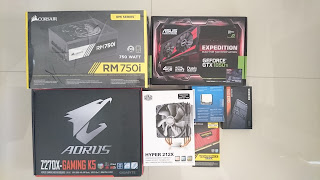
So the decision was made. I then decided that I was going to build my own PC because...FUN. For 3 to 4 months, I chopped and change my PC components list in PC Case Gear and last week, once I could not wait any longer, I made the plunge. The shipment made it from NSW to Darwin in just over 24 hours which I must say, is a new record in terms of shipping speeds that I have experienced.
Like a 10-year old staring at his first Star Wars Lego set, I could not contain my excitement and wanted to get building right away.
 |
| Phantom 630 - Monster of a case |
Putting the PC together was a lot harder than I expected it to be. Naturally, I hadn't done this before and just assumed it would be akin to a Star Wars Lego set. Come to think of it, I never had a Star Wars Lego set! It's all starting to make sense now.
Anyway, the part that I really struggled with was with connecting the cables. Fitting the components in was a rather straightforward affair. The cables on the other hand were tricky. With PC builders interested in custom PCs that resembled space-aged systems, wires were no longer coloured in the traditional circuitry colours. Every wire that came with my components (and there were at least 20) was black!
 |
| Gigabyte Auros Z270X Gaming 5 |
The first night, I spent 4 hours trying to piece the PC together. The irony was that I was following instructions from a YouTube video titled, 'How to Build a PC in 30 Minutes'. It was all going smoothly until the instructional dude magically skipped all the cabling to show what the finished product looked like.
The following day, I went through a dozen other videos and managed to piece together my PC thanks to particularly fantastic wiring instructions from EasyPCbuilder. Here is the link to the video:
How to build a computer in 30 minutes with EasyPCbuilder! - Gaming PC. Yes this was another 30 minute claimant and no it definitely did not take me 30 minutes. I was at it for another 2 hours or so. Finally, I had everything put together. With my creation near completion, I plugged in the power cable, took a deep breath and gently depressed the power button on the PC case. Nothing happened. OK, maybe I was too gentle. I downed a can of spinach, flexed my right bicep, and once again depressed the power button. Nope, nada, niente, kitu (thats 'nothing' in Swahili by the way).
 |
| 32GB RAM and Intel 7700K CPU |
 |
| It was a 'wirey' mess |
 |
| Sang's IT Helpdesk - wonder what was going through her head |
Frustration mounted. I could not figure out what I did wrong. My wonderful wife saw that I was frustrated and poked fun at me for wanting to build the PC myself instead of just getting one off the shelve. In her defence, she could see my agony and even meddled with the CPU wires to offer as a sign of genuinely wanting to help. Day 2 passed and Project PC seemed to be en-route to becoming an abject failure. I thought I had figured out the problem when I realised I had not plugged in some part of the cable. Although this did help with getting the power to turn on, it still did not affect the motherboard.
 |
| Hyper 212X CPU Fan cooler |
 |
| Asus Expedition 1050 4GB GPU |
Day 3 begun with me raising some questions on Tom's Hardware. It is definitely a fantastic resource for anyone wanting to build a PC. I got many answers to my question but none that could get my system running. I then remembered that Kundan (my friend from Alice Springs), was quite an expert at building PCs. During our phone conversation, Kundan ran through a number of troubleshooting steps to isolate the problem. After almost an hour, he was still unable to put a finger on it - both literally and figuratively. His final suggestion to me was to tear everything apart and rebuild it the system outside the case component by component.
 |
| External Build |
I stood over the dead black metal box lying no the floor. The time was 9.45pm. If I started this now, it may very well be a long night. I knew I had to get to bed by 11pm to spare myself from having Squidward eyes the following day. I also knew that if I opted to do it the next day, I would probably have yet another sleepless night. Decisions, decisions.
 |
| Samsung 960 Evo M2 NVME SSD 500GB - OH SO FAST! |
The out-of-body operation was a go! I quickly deconstructed everything I had put together, removed every cable and arranged them neatly on the side and started from scratch. One by one I added the components outside the case. With each component added, I would turn on the PSU (power supply unit) to check if the MOBO (motherboard) was powering up. It did. Every. Single. Time.
Finally, I had built the PC and I squealed in victory as the BIOS booted up on my monitor. The PC had been built successfully. The problem was, everything was outside the case. Riding on euphoria, I carefully reconstructed the components in the case and after 30 minutes (apparently those 30min videos weren't lying), my PC was complete. It was now time to load the OS (Windows 10 obviously) and watch the PC enter a world of familiarity. After a total of about 8 hours over three days, I could not enjoy the digital fruit of my physical labour.
Was it worth it? (Hint: Read photo caption to find out)
 |
| The final product - Could not be happier! There is a sense of pride and achievement that you do not get when you buy a PC off the shelf. And I am pretty sure it would not look this good too :) |
 So the decision was made. I then decided that I was going to build my own PC because...FUN. For 3 to 4 months, I chopped and change my PC components list in PC Case Gear and last week, once I could not wait any longer, I made the plunge. The shipment made it from NSW to Darwin in just over 24 hours which I must say, is a new record in terms of shipping speeds that I have experienced.


Thank you Sumon :)
ReplyDelete